해당 이슈를 영상으로 우선 보자.

ViewGroup 자체는 늘어났다가 줄었다가 잘 되는걸 볼 수 있지만 ConstraintLayout 뷰 안의 텍스트 뷰들이 제대로 자리를 잡지 못하면서 뷰가 깨져 보인다.

해당 이슈는 ConstraintLayout 은 동적으로 뷰가 변경 될 때는 ConstraintLayout 연결 관계를 clone 해서 다시 해당 뷰에 적용 시켜주어야 제대로 변경이 된다.

그래서 ViewGroup 안에 모든 ConstraintLayout 을 찾아서 clone 해서 apply 까지 해주는 notifyConstraintView fun 을 만들어서 해결 하였다.

아래는 전체적인 코드인데 notifyConstraintView 을 사용하면 정상작동 안하면 위와 같이 뷰가 깨지는걸 볼 수 있다.

class MainActivity : AppCompatActivity() {
    private var _binding: ActivityMainBinding? = null
    protected val binding: ActivityMainBinding
        get() = _binding as ActivityMainBinding

    private var valueAnimator: ValueAnimator? = null

    override fun onCreate(savedInstanceState: Bundle?) {
        super.onCreate(savedInstanceState)
        _binding = ActivityMainBinding.inflate(layoutInflater)
        binding.apply {
            setContentView(root)
            tvTitle.text = "접기"
            tvTitle.setOnClickListener {
                expandOrCollapse()
            }
        }
        initLinearLayoutContent()
    }

    private fun initLinearLayoutContent() {
        listOf(
                Item("첫번째", "first"),
                Item("두번째", "second"),
                Item("세번째", "third")
        ).forEach {
            val itemContentBinding = ItemContentBinding.inflate(LayoutInflater.from(this), binding.llContent, false).apply {
                tvTitle.text = it.title
                tvContent.text = it.content
            }
            binding.llContent.addView(itemContentBinding.root)
        }
    }

    private fun expandOrCollapse() {
        binding.apply {
            if (tvTitle.text == "접기") {
                tvTitle.text = "펼치기"
                collapse(llContent)
            } else {
                tvTitle.text = "접기"
                expand(llContent)
            }
        }
    }

    private fun expand(view: View) {
        view.visibility = View.VISIBLE
        val widthSpec = View.MeasureSpec.makeMeasureSpec(0, View.MeasureSpec.UNSPECIFIED)
        val heightSpec = View.MeasureSpec.makeMeasureSpec(0, View.MeasureSpec.UNSPECIFIED)
        view.measure(widthSpec, heightSpec)
        valueAnimator = getSlideAnimator(0, view.measuredHeight, view).apply {
            start()
        }
    }

    private fun collapse(view: View) {
        val finalHeight = view.height
        valueAnimator = getSlideAnimator(finalHeight, 0, view).apply {
            addListener(object : Animator.AnimatorListener {
                override fun onAnimationEnd(animator: Animator) {
                    view.visibility = View.GONE
                }

                override fun onAnimationStart(animator: Animator) {}
                override fun onAnimationCancel(animator: Animator) {}
                override fun onAnimationRepeat(animator: Animator) {}
            })
            start()
        }
    }

    private fun getSlideAnimator(start: Int, end: Int, view: View): ValueAnimator {
        val animator = ValueAnimator.ofInt(start, end)
        animator.duration = 300
        animator.addUpdateListener { valueAnimator -> //Update Height
            val value = valueAnimator.animatedValue as Int
            val layoutParams = view.layoutParams
            layoutParams.height = value
            notifyConstraintView(view)
            view.layoutParams = layoutParams
        }
        return animator
    }

    /*
     * ConstraintSet clone 사용하기 때문에 부모 ConstraintLayout 의 자식 뷰들은 모두 id를 지정해 주어야 함.
     * */
    private fun notifyConstraintView(view: View) {
        if (view is ViewGroup) {
            if (view.childCount > 0) {
                view.children.forEach {
                    if (it is ViewGroup) {
                        if (it is ConstraintLayout) {
                            with(ConstraintSet()) {
                                clone(it)
                                applyTo(it)
                            }
                        }
                    } else {
                        notifyConstraintView(it)
                    }
                }
            }
        }
    }

    data class Item(val title: String, val content: String)

    override fun onDestroy() {
        valueAnimator?.cancel()
        super.onDestroy()
    }
}

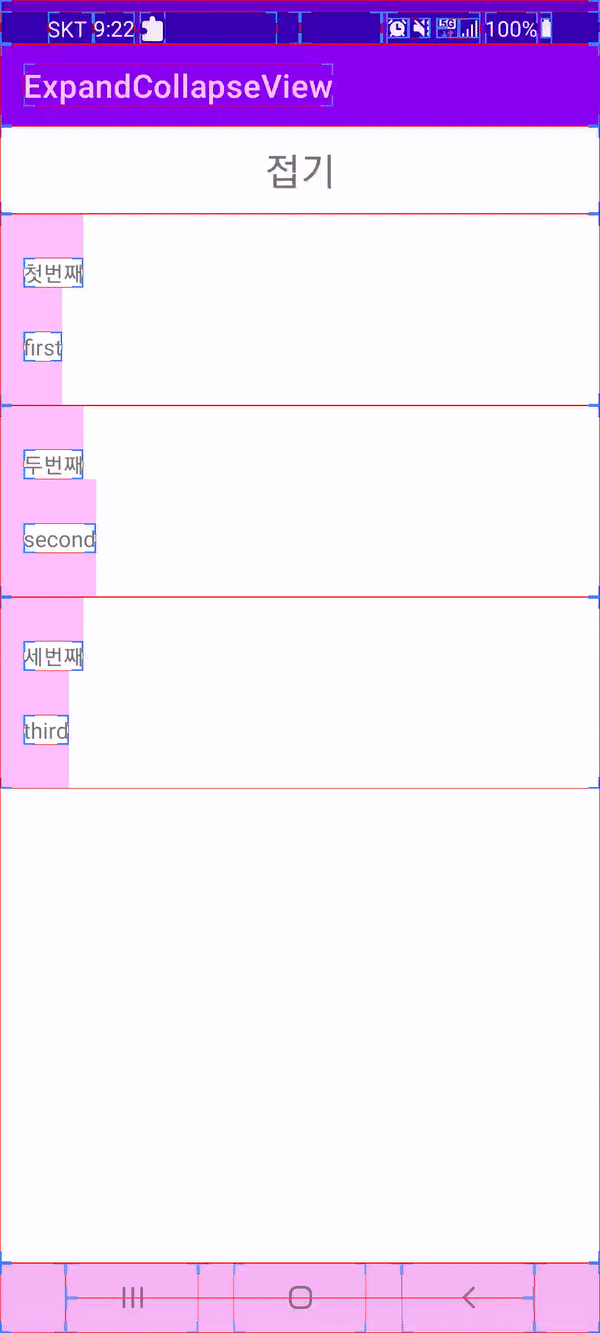
뷰가 깔끔하게 잘 나오는것을 확인 할 수 있다.

제네릭

제네릭은 객체 내부에서 사용할 데이터 타입을 외부에서 정하는 기법이다.

제네릭을 사용하면 클래스를 선언할 때 타입을 확정 짓지 않고, 클래스가 객체화되는 시점에 타입이 결정된다.

다음은 예제를 보자.

class GenericTest {

    @Test
    fun test() {
        val box  = Box (1)
    }

    class Box(var value : Int)

    @Test
    fun test2(){
        val secondBox = SecondBox("secondBox")
    }

    class SecondBox<T>(var value : T)
}

Box 클래스는 타입이 Int 인 value 를 가지고 있다.

제네릭을 사용하지 않고 클래스를 선언한 예이다.

여기서는 클래스가 가진 값이 Int 타입으로 고정되어 있어서 Int 값만 받을 수 있다.

다른 타입도 담고 싶은 경우에 SecondBox 처럼 제네릭을 사용하면 해결할 수 있다.

제네릭 함수 선언

리스트에 포함된 숫자의 합을 구하는 함수라면 타입이 Int나 Double 등이 사용될 것이다.

이럴때는 제네릭의 사용이 적합하지 않지만 모든 타입에 잘 작동하는 함수라면 다르다.

예를 들어 리스트의 첫번째 값을 꺼내오는 함수라면 타입에 관계없이 동작하므로 제네릭을 활용해 일반화 하기 적합하다.

구현 코드는 아래와 같다.

fun <T> head(list: List<T>): T{
        if(list.isEmpty()){
            throw NoSuchElementException()
        }
        return list[0]
}

컬렉션

함수형 프로그래밍에서는 불변 자료구조를 사용한다. 불변 자료구조는 객체의 상태 변화를 미연에 방지해서 부수효과를 근본적으로 방지한다. 코틀린에서는 mutable 과 immutable 를 구분해서 사용한다.

리스트

비어 있거나 동일한 타입의 값들을 여러 개 넣을 수 있는 자료구조다.

class ListTest {

    @Test
    fun plusListItem(){
        val list = listOf(1,2,3,4,5)
        val newList = list.plus(6)

        println(list)    //[1, 2, 3, 4, 5]
        println(newList) //[1, 2, 3, 4, 5, 6]
    }

    @Test
    fun addListItem(){
        val list = mutableListOf(1,2,3,4,5)
        println(list) //[1, 2, 3, 4, 5]
        list.add(6)
        println(list) //[1, 2, 3, 4, 5, 6]
    }

}

위의 차이점은 plus는 새로운 리스트를 반환 하지만 add는 해당 리스트에 추가로 아이템을 더해 준다.

세트

리스트와 동일한 타입의 값들을 여러 개 넣을 수 있다는 점에서 리스트와 유사하나 중복값이 들어갈 수 없다는 점이 리스트와 다르다.

class SetTest {
    @Test
    fun testSet() {
        val set = setOf("1", "2", "3")
        println(set) //[1, 2, 3]
        val newSet = set.plus("4")
        println(newSet) //[1, 2, 3, 4]

        val mutableSet = mutableSetOf("1", "2", "3")
        println(mutableSet) //[1, 2, 3]
        mutableSet.add("4")
        println(mutableSet) //[1, 2, 3, 4]
        mutableSet.add("4")
        println(mutableSet) //[1, 2, 3, 4]
    }
}

4를 두번 더했지만 4는 한번만 들어 간다.

코틀린에서는 키와 값을 가진 자료구조인 Pair 를 제공한다. 맵은 키와 값인 Pair 를 여러개 가진 자료구조이다.

class MapTest {

    @Test
    fun testMap() {
        val map1 = mapOf(1 to "One", 2 to "Two")
        val map2 = map1.plus(3 to "Three")

        println(map1) //{1=One, 2=Two}
        println(map2) //{1=One, 2=Two, 3=Three}

        val mutableMap = mutableMapOf(1 to "One", 2 to "Two")
        println(mutableMap)  //{1=One, 2=Two}
        mutableMap[3] = "Three" // mutableMap.put(3,"Three") 와 같다.
        println(mutableMap)  //{1=One, 2=Two, 3=Three}
    }
}

맵도 마찬가지로 plus는 새로운 맵을 반환 하지만 put은 해당 맵에 추가로 아이템을 더해 준다.

2-6 패턴 매칭

패턴 매칭이란 값,조건,타입 등의 패턴에 따라서 매칭 되는 동작을 수행하게 하는 기능을 말한다.

아래는 패턴 매칭의 예제 이다.

import org.junit.Test

class PatternMatchingTest {

    @Test
    fun testPatternMatching() {
        println(checkValue("kotlin"))            //kotlin 출력
        println(checkValue(5))                   //1..5 출력
        println(checkValue(6))                   //6 or 8 출력
        println(checkValue(User("영훈", "주소")))  //User 출력
        println(checkValue(12))                  //else 출력
    }

    data class User(val name: String, val address: String)

    private fun checkValue(any: Any) = when (any) {
        "kotlin" -> "kotlin"
        in 1..5 -> "1..5"
        6, 8 -> "6 or 8"
        is User -> "User"
        else -> "else"
    }
}

패턴 매칭의 한계에 대해 살펴 보자.

    @Test
    fun testSecondPatternMatching() {
        println(checkValue(listOf(1,2,3)))
        println(checkValue(listOf("1","2","3")))
        println(checkValue(2))
    }

    private fun checkValue(any: Any) = when (any) {
        List<Int> -> "Int List"
        List<String> -> "String List"
        else -> "else"
    }

위의 코드는 컴파일 에러가 발생 된다. 리스트와 같은 매개변수를 포함하는 타입이나 함수의 타입에 대한 패턴 매칭을 지원하지 않기 때문이다.

패턴 매칭을 사용한 sum 함수를 만들려면 어떤식으로 구현 해야 할까?

import org.junit.Test

class PatternMatchingTest {

    @Test
    fun testSum() {
        println(sum(listOf(1, 2, 3, 4, 5)).toString())
    }

    fun sum(numbers: List<Int>): Int = when {
        numbers.isEmpty() -> 0
        else -> numbers.first() + sum(numbers.drop(1))
    }

}

sum 재귀 함수를 사용하였다. List 를 비교 하지 못하기 때문에 size 를 비교해 구현 되었다.

2-7 객체 분해

객체 분해란 어떤 객체를 구성하는 프로퍼티를 분해하여 편리하게 변수에 할당하는 것을 말한다.

class DestructuringDeclarationTest {
    @Test
    fun test(){
        val user = User("영훈", "주소")
        val (name , address) = user  //객체 분해 사용
        println("user name : "+user.name)
        println("객체분해 name : "+name)
        println("user address : "+user.address)
        println("객체분해 address : "+address)
    }

    data class User(val name: String, val address: String)
}

일반적으로 user 를 통해서 name , address 를 접근 하게 되는데 객체 분해는 한번 분해해서 할당하면 name , address 바로 접근 가능하다.

클래스와 프로퍼티

class User(var name: String, val age: Int = 18)

val user = User("yh", 31)
println(user.name) //"yh" 출력

user.name = "yh2"
println(user.name) //"yh2" 출력

val user2 = User("yh")
println(user2.age) //18 출력

User class 는 age 가 default value 18로 세팅 되어 있어서 user2 객체의 age는 18 값이 나온다.

data 클래스

기본적으로 게터 세터 함수를 생성해주고 hashCode, equals, toString 함수와 같은 자바 Object 클래스에 정의된 함수들을 자동으로 생성한다.

data class Person(val name : String, val age : Int)

enum 클래스

특정 상수에 이름을 붙여 주는 클래스다.

enum class Error(val num : Int){
    WARN(2){
        override fun getErrorName(): String {
            return "WARN"
        }
    },
    ERROR(3){
        override fun getErrorName(): String {
            return "ERROR"
        }
    },
    FAULT(2){
        override fun getErrorName(): String {
             return "FAULT"
        }
    };
    abstract fin getErrorName(): String
}

Error 가 가진 WARN , ERROR , FAULT 모두 Int 형 num 프로퍼티와 getErrorName 함수를 가지고 있다.

sealed 클래스

sealed 클래스는 새로운 타입을 확장할 수 있고 확장 형태로 클래스를 묶은 클래스이다.

sealed class Color {
    object Red : Color()
    object Green : Color()
    object Blue : Color()

    fun print() {
        when (this) {
            Red -> {
                println("빨간색")
            }
            Green -> {
                println("초록색")
            }
            Blue -> {
                println("파란색")
            }
            //sealed class 인 경우 else 를 구현하지 않아도 됨.
        }
    }
}

@Test
fun test() {
    var color: Color = Color.Red
    color.print() //빨간색 출력
    color = Color.Blue
    color.print() //파란색 출력
}