템플릿 메소드 패턴 정의

메소드에서 알고리즘의 골격을 정의한다.
알고리즘의 여러 단계 중 일부는 서브클래스에서 구현할 수 있습니다.
템플릿 메소드를 이용하면 알고리즘의 구조는 그대로 유지하면서 서브클래스에서 특정 단계를 재정의할 수 있습니다.

헐리우드 원칙(디자인 원칙)

먼저 연락하지 마세요. 저희가 연락 드리겠습니다. -> 의존성 부패를 방지 할 수 있다.

의존성 부패란?

고수준 구성요소가 저수준 구성요소에 의존하고 그 저수준 구성요소는 다시 고수준 구성요소에 의존하게 된다면 서로에게 의존성이 있다는걸 알 수 있다.
이런 현상을 의존성 부패라고 한다.

템플릿 패턴 언제 사용할까!?

CustomActionBar
왼쪽 뒤로가기 메뉴 버튼
타이틀
흰색 배경

SecondCustomActionBar
왼쪽 뒤로가기 메뉴 버튼
타이틀
분홍색 배경
오른쪽 즐겨찾기 버튼(CustomActionBar 에는 없음)

두개의 CustomActionBar 가 있다고 가정하고 공통된 부분을 찾아보자.
왼쪽 뒤로가기 메뉴 버튼은 완전 동일 하고 타이틀과 배경을 셋팅 하는 부분은 타이틀과 배경색은 다르지만 셋팅하는 부분은 공통된 부분이다.
그리고 오른쪽 즐겨찾기 버튼은 CustomActionBar 에는 존재하지 않는다. 이부분은 hook를 통해서 처리 한다.

아래의 코드를 보자.

class TemplateMethodPattern {
    @Test
    fun test() {
        val customActionBar = CustomActionBar()
        customActionBar.prepare()

        println("----------------------------------------------")

        val secondActionBar = SecondCustomActionBar()
        secondActionBar.prepare()
    }

    abstract class ActionBar {
        fun prepare() {
            initTitle()
            initBackButtonView()
            setBackground()
            hook()
        }

        abstract fun initTitle()

        private fun initBackButtonView() {
            println("뒤로가기 버튼 셋팅")
        }

        abstract fun setBackground()

        open fun hook() {

        }
    }

    class CustomActionBar : ActionBar() {
        //왼쪽 뒤로가기 메뉴 버튼
        //타이틀 셋팅
        //흰색 배경
        override fun initTitle() {
            println("Title: CustomActionBar")
        }

        override fun setBackground() {
            println("흰색 배경")
        }
    }

    class SecondCustomActionBar : ActionBar() {
        //왼쪽 뒤로가기 메뉴 버튼
        //타이틀 셋팅
        //분홍색 배경
        //오른쪽 즐겨찾기 버튼(CustomActionBar 에는 없음)

        override fun initTitle() {
            println("Title : SecondCustomActionBar")
        }

        override fun setBackground() {
            println("분홍색 배경")
        }

        override fun hook() {
            println("오른쪽 즐겨찾기 버튼 셋팅")
        }
    }

}

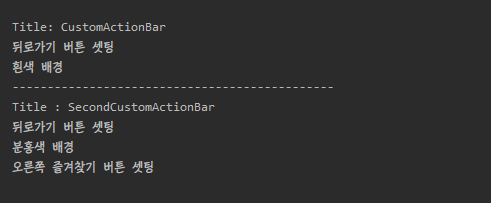
아래는 테스트 결과이다.
퍼사드 패턴 정의

어떤 서브시스템의 일련의 인터페이스에 대한 통합된 인터페이스를 제공합니다.
퍼사드에서 고수준 인터페이스를 정의하기 때문에 서브시스템을 더 쉽게 사용할 수 있습니다.

디자인 원칙 최소 지식 원칙 - 정말 친한 친구하고만 얘기하라.

퍼사드 패턴 언제 사용할까!?

아래의 코드를 보자.


class FacadePattern {

    @Test
    fun test() {
        val computerFacade = ComputerFacade(Monitor(), Speaker())
        computerFacade.on()
        println("----------------------------------")
        computerFacade.off()
    }

    class ComputerFacade(private val monitor: Monitor, private val speaker: Speaker) {
        fun on() {
            monitor.on()
            speaker.on()
            speaker.volume = 5
        }

        fun off() {
            speaker.volume = 0
            speaker.off()
            monitor.off()
        }
    }

    class Monitor {
        fun on() {
            println("Monitor on")
        }

        fun off() {
            println("Monitor off")
        }
    }

    class Speaker {
        var volume = 0
            set(value) {
                println("volume set : $value")
                field = value
            }

        fun on() {
            println("Speaker on")
        }

        fun off() {
            println("Speaker off")
        }
    }

}

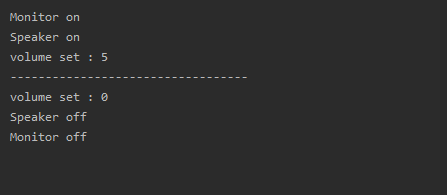
위의 코드를 보면 클라이언트 입장에서 ComputerFacade 만 알고 있으면 컴퓨터를 키고 끄는데 문제가 없다.
위의 클래스들은 간단하게 구현 했기때문에 쉽게 보일 수 있지만 컴퓨터가 부팅 되는 과정 까지 모두 포함된 내용을 클라이언트에서 알아야 한다면!?
클라이언트 입장에서 컴퓨터를 키는 도중에 지쳐서 그만둘지도 모른다.
이런 과정들을 최소한으로만 알게 하기 위해 퍼사드 패턴을 사용한다.
아래는 테스트 결과 이다.

어댑터 패턴 정의

한 클래스의 인터페이스를 클라이언트에서 사용하고자 하는 다른 인터페이스로 변환합니다.
어댑터를 이용하면 인터페이스 호환성 문제 때문에 같이 쓸 수 없는 클래스들을 연결해서 쓸 수 있습니다.

어댑터 패턴 언제 사용할까!?

예를 들어 기존 NormalPager 를 사용하고 있는데 LibPager 를 같이 사용해야 하는 상황이 생겼다고 가정 함.
근데 LibPageListener 는 PageListener 와 다르게 같은 기능인데 다른 메소드명을 가지고 있다.
그리고 LibPageListener 에는 없는 기능(onDoubleNextPage,onDoublePreviousPage)이 PageListener에는 존재 한다.
LibPagerAdapter 를 통해서 해결해보자!!

아래의 코드를 보자.


class AdapterPattern {

    interface PageListener {
        fun onPreviousPage()
        fun onDoublePreviousPage()
        fun onNextPage()
        fun onDoubleNextPage()
    }

    class NormalPager : PageListener {

        override fun onPreviousPage() {
            println("NormalPager onPreviousPage")
        }

        override fun onDoublePreviousPage() {
            println("NormalPager onPreviousPage")
            println("NormalPager onPreviousPage")
        }

        override fun onNextPage() {
            println("NormalPager onNextPage")
        }

        override fun onDoubleNextPage() {
            println("NormalPager onNextPage")
            println("NormalPager onNextPage")
        }
    }

    class LibPager : LibPageListener {
        override fun onPrevious() {
            println("LibPager onPrevious")
        }

        override fun onNext() {
            println("LibPager onNext")
        }

    }

    interface LibPageListener {
        fun onPrevious()
        fun onNext()
    }

    class LibPagerAdapter(private val libPageListener: LibPageListener) : PageListener {

        override fun onPreviousPage() {
            libPageListener.onPrevious()
        }

        override fun onDoublePreviousPage() {
            libPageListener.onPrevious()
            libPageListener.onPrevious()
        }

        override fun onNextPage() {
            libPageListener.onNext()
        }

        override fun onDoubleNextPage() {
            libPageListener.onNext()
            libPageListener.onNext()
        }

    }

	@Test
    fun test() {
        val normalPager = NormalPager()
        normalPager.onNextPage()
        normalPager.onPreviousPage()
        normalPager.onDoubleNextPage()
        normalPager.onDoublePreviousPage()

        val libPager = LibPager()
        val libPagerAdapter = LibPagerAdapter(libPager)
        libPagerAdapter.onNextPage()
        libPagerAdapter.onPreviousPage()
        libPagerAdapter.onDoubleNextPage()
        libPagerAdapter.onDoublePreviousPage()
    }

}

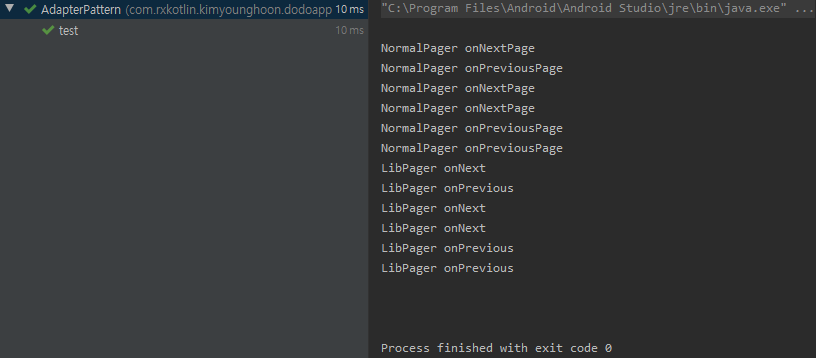
위의 코드를 보면 onDoublePreviousPage,onDoubleNextPage 는 LibPageListener 없지만 같은 기능을 하게 만들어 주었다.

아래의 결과를 보면 동일하다.

이터레이터 패턴 정의

컬렉션 구현 방법을 노출시키지 않으면서도 그 집합체 안에 들어있는 모든 항목에 접글할 수 있는 방법을 제공한다.

컬렉션 종류가 다양하고 항목을 접근하는 방식도 조금씩 다르기 때문에 대응하기가 까다롭거나 코드가 지저분해질 수 있다.
Iterator 패턴을 사용해서 해결해보자.
CustomDialogView 라는 임의의 클래스를 만들어서 iterator 매개변수로 받는 생성자를 하나 만들고 printAll 이라는 함수를 만들어서 모든 항목에 접근해 print 하도록 만들었다.

아래의 코드를 보자.

class IteratorPatternTest {
    @Test
    fun test() {
        val array = arrayOf("first", "second", "third")
        var listDialog = CustomDialogView(array.iterator())
        listDialog.printAll()

        val arrayList = arrayListOf(1, 2, 3)
        listDialog = CustomDialogView(arrayList.iterator())
        listDialog.printAll()

        val hashMap = hashMapOf(
            Pair(1, "one"),
            Pair(2, "two"),
            Pair(3, "three")
        )
        listDialog = CustomDialogView(hashMap.iterator())
        listDialog.printAll()
    }

    class CustomDialogView(private val iterator: Iterator<Any>) {
        fun printAll() {
            while (iterator.hasNext()) {
                val any = iterator.next()
                if (any is Map.Entry<*, *>) {
                    println(any.value)
                } else {
                    println(any)
                }
            }
        }
    }
}

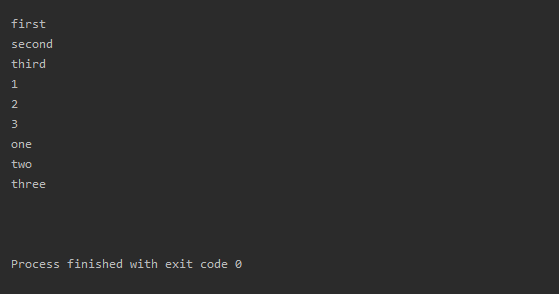
hasNext 는 더 꺼낼 항목 여부에 따라 boolean 을 return 하고 next 는 해당 항목을 return 한다. array, arrayList, hashMap 3가지를 사용하지만 iterator 패턴을 통해 쉽게 구현할 수 있다.

아래 사진을 보면 모두 이상 없이 프린트 된 결과를 볼 수 있다.

커맨드 패턴 정의

커맨드 패턴을 이용하면 요구 사항을 객체로 캡슐화 할 수 있으며, 매개변수를 써서 여러 가지 다른 요구 사항을 집어넣을 수도 있습니다.
또한 요청 내역을 큐에 저장하거나 로그로 기록할 수도 있으며, 작업취소 기능도 지원 가능합니다.

아래의 코드를 보자.

class CommandPatternTest {

    class RemoteControl {
        private val onCommand: HashMap<Int, Command> = hashMapOf()
        private val offCommand: HashMap<Int, Command> = hashMapOf()
        private var unDoCommand: Command? = null

        fun addCommand(slot: Int, onCommand: Command, offCommand: Command) {
            this.onCommand[slot] = onCommand
            this.offCommand[slot] = offCommand
        }

        fun onButtonWasPushed(slot: Int) {
            onCommand[slot]?.let {
                it.execute()
                unDoCommand = it
            }
        }

        fun offButtonWasPushed(slot: Int) {
            offCommand[slot]?.let {
                it.execute()
                unDoCommand = it
            }
        }

        fun unDoButtonWasPushed() {
            unDoCommand?.let {
                it.undo()
            }
        }
    }

    interface Command {
        fun execute()
        fun undo()
    }

    class Light {
        fun on() {
            println("Light On")
        }

        fun off() {
            println("Light Off")
        }
    }

    class LightOffCommand(private val light: Light) : Command {
        override fun execute() {
            light.off()
        }

        override fun undo() {
            light.on()
        }
    }

    class LightOnCommand(private val light: Light) : Command {
        override fun execute() {
            light.on()
        }

        override fun undo() {
            light.off()
        }
    }

    class KitchenLight {
        fun on() {
            println("KitchenLight On")
        }

        fun off() {
            println("KitchenLight Off")
        }
    }

    class KitchenOffCommand(private val kitchenLight: KitchenLight) : Command {
        override fun execute() {
            kitchenLight.off()
        }

        override fun undo() {
            kitchenLight.on()
        }
    }

    class KitchenOnCommand(private val kitchenLight: KitchenLight) : Command {
        override fun execute() {
            kitchenLight.on()
        }

        override fun undo() {
            kitchenLight.off()
        }
    }

    @Test
    fun testRemoteControl() {
        val remoteControl = RemoteControl()
        val light = Light()
        remoteControl.addCommand(
            slot = 0,
            onCommand = LightOnCommand(
                light
            ),
            offCommand = LightOffCommand(
                light
            )
        )

        val kitchenLight = KitchenLight()
        remoteControl.addCommand(
            slot = 1,
            onCommand = KitchenOnCommand(
                kitchenLight
            ),
            offCommand = KitchenOffCommand(
                kitchenLight
            )
        )

        remoteControl.onButtonWasPushed(0)
        remoteControl.offButtonWasPushed(0)
        remoteControl.onButtonWasPushed(1)
        remoteControl.offButtonWasPushed(1)
        remoteControl.unDoButtonWasPushed()
    }

}

리모트컨트롤에서 Command 를 추가 해서 on,off 버튼을 사용할 수 있고 unDoCommand 를 통해 마지막 실행한 명령을 되돌릴 수 있다. 아래는 테스트 결과 이미지이다.